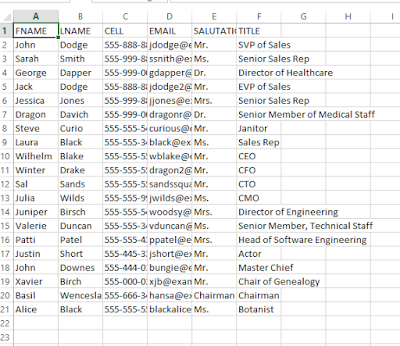
Importing Data into Salesforce using Salesforce’s Data Wizard
(and Mapping Unmapped Fields)
By Elizabeth Kilgore 1/17/2016
First, click setup and go to the Quick Findbox and type in
Data Import Wizard
Click on the Data Import Wizard drop down under Data
Management tab. It should take you to this page.
Scroll down until you see the button that says Launch Wizard
and click on it.
Under What Kind Of Data Are You Importing stay on Standard Objects
for this tutorial and under Stander Objects click on Accounts and Contacts.
Then more options will pop up under What Do You Want To Do? Looking like this after
clicking the tab Add New Records the drop should look like this.
In the Add New Records drop downs under the option Match
Contact By select Name, and under the option Match Contact By select Account
Name And Account Site. Go to the next box labeled Where Is Your Data Located and
click CSV you will see a downloader click it and select the Excel File that you
need to upload. Under the dropdown label Character Code select ISO-8859-1
(General US & Western European ISO-LATIN-1) It should look like this when
you are finished
Click next the next page should look like this
As you can see there are some unmapped files, let’s Map
those before we move on.
Mapping you unmapped fields.
Next to the read Unmapped label on the left you can see a
blue Map Label click on it, a window will pop up that looks like this
Next to the Map To: there is a dropdown to the right of it select
the dropdown option labeled Salesforce Field. It is important to map you’re
your field correctly, if your field is a name map it in name if it is a cell
phone map it in mobile. In the example, the first to unmapped fields are names
FNAME and LNAME so you would map these to Contact:Name and the third to would
go to mobile keep in mind that LNAME is the second name on the account so you should be mapped to Contact2 Name. Here are example screen shots of
what this should look like the following photo
When you select the proper field a little green check mark
shows up click map and the page should now look like this
Finish remapping your
fields to make the page look like this with no red markings and then click
next.
The next page should be the Start Import page
Click Start Important. Note: sometimes the Wizard will tell
you the import fail before clicking back and making changes and trying to fix
things wait for the email that tells you the import was successful. Sometimes
the Wizard says an import has failed when it actually went through and was successful,
in order to keep you from having to delete clones wait for the email and if
after some time you do not receive a confirmation email then try again.


No comments:
Post a Comment